fsorvin Autochrome LUTs
该 LUT 集模拟了 Lumière 兄弟美丽的 Autochrome 早期彩色胶片工艺。 Autochrome 于 1907 年投入生产,是一种加色彩色摄影技术,后来又尝试了电影处理技术,它使用彩色马铃薯淀粉粒镶嵌在单色玻璃板乳剂上,对记录的图像进行过滤和着色。
Autochrome 并不常见印刷(除非转移用于批量印刷,如《国家地理》),但更常见的是在立体镜或透光镜中观看,透光镜是一个使用日光、镜子和扩散板来照亮相机原始板的盒子。 在后面。
Autochrome 的马赛克染色红橙色、绿色和蓝紫色的马铃薯淀粉颗粒非常小,以至于看不见,但混合在一起形成了颜色的印象,就像现在的 RGB 显示器一样。 可以看到彩色马赛克上颗粒不精确分布形成的团块。 该 LUT 无法模拟聚集。 如果您想对其进行模拟,请在图像链中的 LUT 之前添加噪声层。
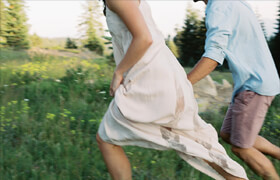
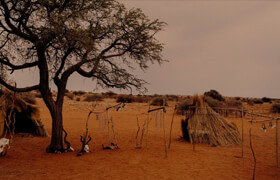
橙红色、绿色和紫蓝色可以产生一些非常美丽的肤色,以及一些有趣的风景。 如果您喜欢的话,可以调高鲜艳度或饱和度以获得梦幻般的色彩,也可以调低一切以获得复古褪色的外观。 如果您确实想要真实,请使用较长的曝光时间进行拍摄。 Autochrome 在日光下的曝光时间为 3 到 4 秒,因此请让拍摄对象摆好姿势并带上三脚架。
Autochrome 往往会发生蓝移,因此 Lumiere 建议在镜头前使用黄色滤镜。 此 LUT 包中包含一组预过滤的 LUT,设置为 10% 到 40% 黄色,以及一个未过滤的 LUT,您可以在自己的黄色过滤器中拨动。 只需使用黄色纯色图层,色相:59,亮度 100%,饱和度从 0 到 100%。 将图层叠加到原来的图层上,就可以开始了。
这个和我的其他 LUT 可以被视为颜色转换过程。 它们的设计并不是考虑到特定的摄像机,也不是为了转换日志编码的镜头。 他们以数字方式应用颜色和密度在 Autochrome 过程中经历的颜色转换过程。
使用您最喜欢的 LUT 实用程序应用 LUT。 作为 3D 32 位 LUT 提供,因此它适用于所有 LUT 情况,例如 Premiere、After Effects、Photoshop、显示器甚至 iPhone/Android 应用程序。

This LUT set simulates the Lumière brothers beautiful Autochrome early colour film process. Put into production in 1907, Autochrome was an additive colour photographic and later attempted motion picture process that used a mosaic of coloured potato starch grains layered over monochromatic glass plate emulsion to both filter and colour the recorded image.
Autochromes were not commonly printed (unless transferred for mass printing, like in National Geographic), but were more commonly viewed in a stereoscope or with a diascope, a box that used daylight, a mirror and a diffusion plate to illuminate the camera original plate from behind.
Autochrome's mosaic, dyed potato starch grains of red-orange, green and blue-violet, were so small as to be invisible but blended together to form the impression of colour, much like an RGB display does now. Visible were the clumps formed by the imprecise spread of grains on the colour mosaic. This LUT cannot simulate the clumping. If you want to simulatate it, add in a noise layer before the LUT in your image chain.
The orange-red, green and violet-blue can produce some seriously beautiful skin tones, as well as some interesting landscapes. Dial up the vividness or saturation for the colour of dreams, or dial it all back for a vintage faded look, if that's your thing. And if it's really your thing to be authentic, shoot with long exposure times. Autochrome had exposures of 3 to 4 seconds in daylight, so get your subjects to pose and bring your tripod.
Autochromes tended to be blue shifted, so Lumiere recommended a yellow filter be used in front of the lens. Included in this LUT pack is a set of pre-filtered LUTs, set from 10% to 40% yellow, as well as an unfiltered LUT that you can dial in your own yellow filter. Just use a Yellow solid layer at Hue: 59, Brightness 100% and play with Saturation from 0 to 100%. Multiply the layer over your original and you should be good to go.
This and my other LUTs can be though of as colour transformation processes. They aren't designed with specific cameras in mind, or to transform log-encoded footage. They digitally apply the colour transform process that colour and density would go through in a Autochrome process.
Apply the LUTs using your favourite LUT utility. Comes as a 3D 32-bit LUT, so it works in all LUT situations like Premiere, After Effects, Photoshop, monitors and even iPhone/Android apps.
描述:
标签: lut 调色 预设 后期 色彩分类:资源 > 2D资源 > 调色预设文件
发布:CGer | 查看: | 发表时间:2024/2/17 22:19:15 | 更新时间:2025/4/5 11:55:08
○ 充值或账号问题请【点击这里联系站长】 |


点击消耗 10 CG点(约 1.0 元)解锁 30个通用资源, 24小时内有效!(有效期内不重复扣点)


| 常见问题,点击查询: | ||
| ●CGer(Cg儿)资源下载帮助 | ||
| ●资源名词解释 | ||
| ●注册/登陆问题 | ||
| ●充值出错/修改密码/忘记密码 | ||
| ●充值赠送系统 | ||
| ●文件解压出错/解压密码 | ||
| ●Payment with Paypal | ||
| ●哪些资源会被列为付费资源 | ||
| ●为何要充值解锁 | ||
| ●免责条款 | ||
| ●联系站长(联系站长前请先仔细阅读 免责条款 ,网站只提供资源,不提供软件安装等服务!) | ||