FXPHD - MAR203 - Bipedal Creature Texturing
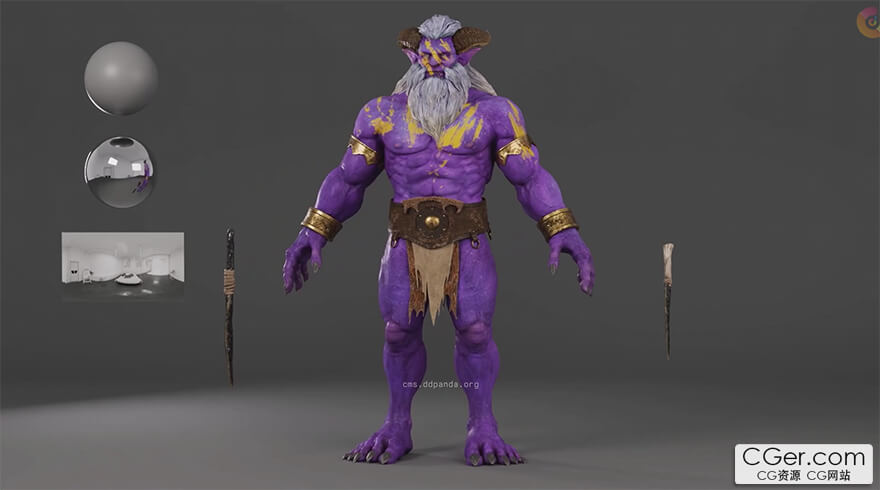
Mari双足生物纹理贴图教程。16GB。
课程列表
第 1 课:参考与实用贴图
我们将讨论参考在贴图过程中的重要性。深入分析概念和模型,提前规划好所有需要的内容,以便正确起步。我们将把模型分解为不同材质,并确定外观开发所需的所有贴图(包括遮罩)。最后,检查过程中所需的所有实用贴图,并进入 Substance Painter 提取它们(AO、曲率、一些基础材质/划痕等)。
第 2 课:Mari 项目设置
本课完全是关于设置。在 Mari 中建立一个清晰、整洁的场景对于开始一个新项目至关重要,尤其是对于像这样包含多种材质的复杂资产。我们将通过节点图的基础来做到这一点。我们将使用之前考虑过的材质及其遮罩、所有输出通道来构建一个树状结构,导入所有实用贴图,并设置一个非常快速的灯光环境。
第 3 课:皮肤 - 漫反射
我们将开始对皮肤进行贴图,目前只处理漫反射贴图。作为这个生物的主要材质,我们将深入探讨在保持艺术视野的同时增加真实感和细节的技巧。
第 4 课:皮肤 - 其他贴图
现在漫反射贴图完成了,我们需要继续处理其他贴图。本课涵盖高光、粗糙度、如何提取迷人的高细节法线贴图,以及次表面散射如何工作,从而创建一套能让皮肤呈现最佳效果的贴图。
第 5 课:毛发(头发和胡须)
现在我们将处理毛发/鬃毛和胡须。在我们的模型中,毛发是一个实体模型,因此有一定的创作空间。我们将进行一些尝试,在我们的贴图中找到合适的平衡,使其看起来尽可能真实。我们将处理所有需要的贴图。
第 6 课:角和爪
这次,我们将专注于角和爪的材质。根据我们的参考,我们将使用一系列贴图(包括法线和 SSS)来添加一些精美的细节。
第 7 课:眼睛和嘴巴
在这节关于生物本体部分的最后一课中,我们将研究眼睛和嘴巴,以及如何让它们看起来有趣或富有肉质感。然后再次梳理我们需要的所有贴图(包括 SSS),以获得逼真的渲染效果。
第 8 课:道具 - 皮革和毛皮
现在我们将开始对服装进行贴图,本课专注于毛皮和皮革材质。它们看起来可能像皮肤和毛发,但我们将以略微不同的方式处理这些材质,看看如何在那些相当相似的材质上获得不错的效果。
第 9 课:道具 - 金属和岩石
我们将专注于金属和岩石材质,使用一些之前从 Substance Painter 和 Designer 导出的贴图,以获得快速、高效的效果。然后我们将了解如何将所有硬表面材质与我们的有机材质整合在一起。
第 10 课:最终检查、导出与渲染
在最后一课中,我们将创建并导出所有区域贴图,然后最后一次检查目前完成的工作,并讨论接下来的外观开发阶段。外观开发需要什么取决于每个艺术家和工作室,当你不知道谁将接手这个资产时,这可能会很棘手,因此遮罩的重要性不言而喻!最后,我们将快速浏览一个预外观开发场景,以及如何展示你的贴图作品。
Class Listing
Class 1: References and Utility Maps
We're going to talk about the importance of references in the texturing process. We'll thoroughly analyze the concept and model, and think ahead about everything we need to start on the right foot. We're going to break down the model into materials and identify all the maps we'll need for lookdev (including masks). Finally, we'll check all the utility maps that will be required in the process and go into Substance Painter to extract them (AO, curvature, some basic materials/scratches).
Class 2: Mari Project Setup
This class will be all about setup. Setting up a clear, clean scene in Mari is essential to start a new project, especially for a complex asset with many materials like this one. We will go through the basics of the node graph to do so. We'll build a tree using the materials and their masks we previously considered, all the output channels, import all our utility maps, and set up a very quick lighting rig.
Class 3: Skin - Diffuse
We will start texturing the skin and work only on the diffuse map for now. As our primary material for this creature, we are going to dive into techniques to add realism and detail while keeping our artistic vision.
Class 4: Skin - Other Maps
Now that our diffuse is done, we need to move on to the other maps. This class covers specular, roughness, how to extract a fascinating, detailed normal map, and how subsurface scattering works to create a good set of maps that make skin look as good as possible.
Class 5: Fur (Hair and Beard)
Now we're going to take care of the hair/mane and beard. In our model, the hair is a solid model, so there's some room for creativity. We'll experiment a bit to find the right balance in our maps to make them look as realistic as possible. We'll take care of all the maps needed.
Class 6: Horns, Claws
This time, we are going to focus on horns and claws materials. Following our references, we are going to bring some nice details using a whole array of maps, including normal and SSS.
Class 7: Eyes and Mouth
In this last class on the actual creature bits, we'll look at the eyes and mouth and how to make them interesting and/or fleshy. Then again, we'll go through all the maps we need (including SSS) to get a realistic render.
Class 8: Props - Leather and Fur
Now we are going to start texturing the outfit, focusing in this class on fur and leather materials. They might look like skin and hair, but we're going to work those materials slightly differently to see another way to get some nice results on those fairly similar materials.
Class 9: Props - Metal and Rock
We will focus on metal and rock materials, using some of our previously exported maps from Substance Painter and Designer to achieve a quick, efficient result. We will then see how to integrate all those hard surface materials with our organic ones.
Class 10: Last Check, Export and Renders
In this last class, we're going to create and export all of our area maps, then check one last time what we've done so far and discuss the lookdev stage ahead. What lookdev needs will depend on each artist and studio, and it can be tricky when you don't know who's taking over the asset — hence the importance of masks! We'll finally have a quick look at a pre-lookdev scene and how to present your texturing work.
描述:
标签: mari 材质 贴图 制作 教程 纹理 人物 角色分类:教程 > 3D教程 > MARI
发布:CGer | 查看: | 发表时间:2026/5/24 11:59:42 | 更新时间:2026/5/24 11:59:42
○ 充值或账号问题请【点击这里联系站长】 |


点击解锁当前付费资源,消耗 30 CG 点(约3.0 元), 24小时内有效(有效期内不重复扣点)
—————————————————————————————————————————————— | ||
| 哪些资源会被列为付费资源? ●站长付费购买的资源,站长从其他途径付费购买的资源。 ●资源包体积巨大,需要大量时间上传,占用大量存储空间的资源。(目前超过10GB的资源可能会列为付费资源) ●内容经常被某些人倒卖并恶意举报的资源,收费可以减少恶意举报的概率。 ●稀少的和高质量的资源。 |



| 常见问题,点击查询: | ||
| ●CGer(Cg儿)资源下载帮助 | ||
| ●资源名词解释 | ||
| ●注册/登陆问题 | ||
| ●充值出错/修改密码/忘记密码 | ||
| ●充值赠送系统 | ||
| ●文件解压出错/解压密码 | ||
| ●Payment with Paypal | ||
| ●哪些资源会被列为付费资源 | ||
| ●为何要充值解锁 | ||
| ●免责条款 | ||
| ●联系站长(联系站长前请先仔细阅读 免责条款 ,网站只提供资源,不提供软件安装等服务!) | ||